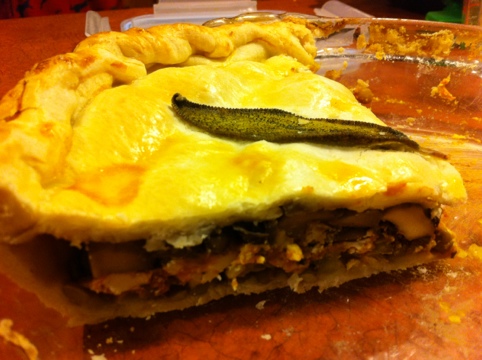
Holiday Pot Pie

20111226-191638.jpg

I recently posted this on our Twitter and Facebook pages. It is a delicious, savory combination that is great served with potatoes, cranberry sauce, and veggie gravy- or by itself!

I make it in a traditional pie crust, but it’s delicious in any shape! It’s also easily made gluten-free by using a pre-made GF crust (Whole Foods has a great one in the frozen section).

Adapted From Whole Foods Pumpkin and Mushroom Pie

“Easy as Pie” Spanakopita


As many of you know, I had to take a two-week break from any kind of cooking while my family relocated to a new kitchen- I mean house.  When we FINALLY unpacked the new kitchen, we had gained a collective 20 lbs from 2 weeks of restaurant eating, and we were in desperate need of something easy and nutrient dense.  So wah-la!  This tasty pie is packed with TWO POUNDS of spinach (that makes up for 14 days without any greens, right?), three eggs for protein, nutritional yeast for some veggie B-vitamins, and is made with spray oil- making it easy AND lower in fat than your traditional pastry. 
 
Afraid of Filo?  I was too, until I worked with it using Pam instead of the basting brush and oil method.  Try it once and you will no longer be intimidated!
 
To make this dairy-free, substitute crumbled tofu for the feta and add salt or Tamari as needed for flavor.


“EASY AS PIE” SPANAKOPITA – serves 6


Make Ahead and Make it Easy

This dish can be made ahead in two ways.  You can make the whole thing, bake it for 30 minutes and freeze.  When it’s dinner time take it out of the freezer and bake it again for about 45-60 minutes.
 
Or, you can make the filling a few days ahead and when you are ready to finish the dish just throw the filling in the dish with the filo and bake.
 
Ingredients
  • 8 sheets filo pastry, defrosted 2 hours at room temp or 8 hours in the fridge (do not open the package, just defrost the whole packet)
  • 1 tsp olive oil
  • 8 scallions, chopped
  • 2 lbs fresh spinach, chopped
  • 3 eggs
  • 2 tsp dried dill
  • 6 oz feta or tofu, crumbled
  • 3 Tbs nutritional yeast
  • salt and pepper to taste
  • Spray cooking oil (such as Pam)

How to make it

  1. Heat oven to 375.
  2. Heat oil in a large dutch oven or pot and saute scallions for 2 minutes.
  3. Add spinach to pot, stir, and cover.  Lower heat to medium-low and let cook for 10 minutes until wilted.  This will look like a LOT of spinach and it is- but it will reduce in volume by 90%.
  4. While the spinach is cooking, beat the eggs and dill in a separate large bowl.
  5. Add the feta or tofu to the egg mixture and stir in the nutritional yeast.  Add salt and pepper (if you are using feta beware it is already salty).
  6. When the spinach is done, drain it for a couple of minutes in a colander and then add it to the egg mixture and stir it up.
  7. Spray a 10-inch pie dish with the cooking spray.
  8. Open the filo, unroll it, and pull of one sheet.  Place it in the dish with the edges overhanging and lightly spry with oil.  Dont worry if you accidentally get two sheets stuck together, or if it tears.  Filo is VERY forgiving.
  9. Repeat until there are 4 layers of filo in the dish.
  10. Spread the spinach mixture into the dish, and top with 4 more layers of filo and spray.
  11. Cut around the edges of the filo as you like and roll the edges up into the dish.
  12. Bake for 45 minutes and enjoy!

“Stuff Your Face” Stuffed Red Peppers

 
Yum!  I have never had an official stuffed bell pepper before, but the other day the peppers at the store looked so vibrant I decided to figure out how to stuff them all by myself.  The result is this good-looking, easy, and healthy meal- and I have no clue if it is what other stuffed pepper recipes are like.
 
Red peppers are higher in lots of good stuff- including antioxidants, lycopene, and vitamins A and C than their green counterparts.  What could be better than filling them up with some protein, rice, and your favorite salsa and calling it a meal?
 
This is a great mix n’ match candidate.  Don’t have any scallions on hand?  Try red onion.  No Rice?  Quinoa will do.  Or experiement with different types of cheese and verious flavors and colors of salsa.  Then go ahead and stuff your face.
 
“STUFF YOUR FACE” STUFFED RED PEPPERS – serves 4

 Make Ahead and Make it Easy

Prepare the peppers up until they are stuffed and keep them covered in foil in the fridge for a few days.  When you are ready to make them add the veggie broth mixture to the dish, put the foil back on, and bake as instructed.
Ingredients
  • 4 big, round red bell peppers
  • 1 cup dried TVP
  • 2 cups boiling water
  • 2 Tbs soy sauce or tamari
  • 1 tsp olive oil
  • 1 onion, chopped
  • 2 garlic cloves, chopped
  • 1 tsp salt
  • 1/2 tsp pepper
  • 1/2 tsp garlic powder
  • 1 cup cooked white or brown rice (1/2 cup cooked in 1 cup water)
  • 1/2 cup your favorite salsa
  • 1/2 cup grated cheese (I like sharp cheddar)
  • 1/2 cup sour cream or plain yogurt
  • 1/2 cup scallions, chopped
  • 1 cup hot water or veggie broth
  • 1 Tbs soy sauce or Tamari

How to make it

  1. First, soak the TVP in the boiling water with 2 Tbs soy sauce or tamari and let it sit.
  2. Cook the rice if you have not already.
  3. Cut the top off of each pepper and remove the innards.  If the pepper “bowl” wont stand up on its own then use a knife to cut off just enough of the bottom to make a flat surface.  Dont worry if there is a hole at the bottom.
  4. Add the tsp of oil to a skillet and over medium heat saute the garlic, onion, salt, pepper, and garlic powder until onions are soft.
  5. Using a sieve or a fine mesh colander drain the excess water from the TVP.
  6. In a large bowl mix together the TVP, onion mixture, rice, salsa, cheese, sour cream or yogurt, and scallions.  If you’re feelin’ it throw some hot sauce into the mix.
  7. Stuff each pepper with 1/4 of the mixture and stand them all upright in a casserole dish.
  8. Pour the hot water and remaining soy sauce or tamari in the dish around the peppers.
  9. Cover the whole thing with foil and bake for 30 minutes.
  10. Uncover, and using a baster squirt some broth into each pepper.
  11. Bake, uncovered for another 15-20 minutes.
  12. Slice each pepper in half and serve open-faced.

World’s Richest Banana Bread

I am not going to try to hoodwink you into thinking this banana bread is healthy. There are plenty of “healthy” banana bread recipes out there and this is not one of them. This is a buttery, rich, “treat-yourself-and-don’t-feel-guilty” kind of banana bread.

We’ve all tried lots and lots of banana bread recipes because we all find ourselves with brown bananas now and again. Well, this one is the best I have ever made. The best thing about this recipe? You probably already have it in your own house. I dug it out of Mark Bittman’s cooking bible How to Cook Everything and it remains my favorite recipe in the book of well over a thousand.

WORLD’S RICHEST BANANA BREAD – makes 1 loaf

Make Ahead and Make it Easy
I oftentimes will make 2 loaves and freeze one wrapped in foil. When we have unexpected company or a hankering for something really sinful (such as banana bread french toast) I’ll take it out to thaw the night before and it’s as good as fresh in the morning.
Ingredients
    • 8 Tbs (1 stick) butter, softened
    • 1 1/2 cups all-purpose flour
    • 1/2 cup whole wheat flour
    • 1 tsp salt
    • 1 1/2 tsp baking powder
    • 3/4 cup sugar
    • 2 eggs
    • 3 very ripe bananas, mashed with a fork
    • 2 tsp vanilla extract
    • 1/2 cup walnuts, chopped
    • 1/2 cup grated dried unsweetened coconut (if you can’t find unsweetened just lessen the sugar by a couple of Tbs)

How to make it

  1. Heat oven to 350 and grease a 9×5 bread pan
  2. Whisk together flours, salt, baking powder, and sugar.
  3. In a separate bowl cream together the butter and the sugar and then add the bananas. Mix well.
  4. Stir the banana mixture into the dry ingredients. Careful not to overmix!
  5. Add the vanilla, nuts, and coconut.
  6. Bake for 50-55 minutes.

From How to Cook Everything by Mark Bittman

Protein-Packed Lemony Chard Stuffed Shells

If you are a vegetarian you no doubt get asked all the time by [mostly] well meaning omnivores  “how do you get enough protein?” The more nutritionally-aware may even ask you about your iron intake.  This dish has all the answers.  It is made with crumbled tofu instead of riccota (you’ll never miss the cheese I promise) and the iron in the chard is made absorbable by the vitamin C in the lemon- making this recipe both delicious AND functional!

One of my favorite cookbook authors of all time is Robin Robertson- this recipe is out of One Dish Vegetarian Meals.  While just about every recipe in the book (and all of her books) is delicious, I have not found any of them to be doable with one dish.  But this one is worth it- easy, summery, light.  Since there is no ricotta it leaves you full, but not feeling like you ate a brick.  And the amount of chard you can fit in there is amazing!  It’s a great dish to just keep a tray of in the freezer for unexpected company. 

Oh- and between you and me, I can’t even count the number of tofu-haters that have gobbled this dish up and asked for seconds.  It is a GREAT way to get more protein into your family’s diet, especially if you are vegetarians.

To make it vegan simply omit the parmesan cheese.

 
PROTEIN-PACKED LEMONY CHARD STUFFED SHELLS – serves 6
 
 Make Ahead and Make it Easy
 
Cook up the filling, stuff the shells and place the pan in the fridge until you are ready to bake it- add the sauce before baking.  Or, assemble everything (sauce included) and freeze it til you are ready to eat it!  If frozen, double the cooking time.
 
Ingredients
  • 1/2 box jumbo shells, cooked al dente
  • 1 Tbs olive oil
  • 2 scallions, minced
  • 1 cup white mushrooms, finely chopped
  • 1 bunch chard, rinsed and finely chopped
  • 1 block firm tofu, drained and blotted dry
  • 1/4 cup grated parmesan cheese (omit to make vegan)
  • zest of 1 lemon
  • juice of one lemon
  • salt and pepper to taste
  • 1 16 oz jar of your favorite “red” pasta sauce

How to make it

  1. Cook the shells until they are about one minute shy of being “done.”  Remove them and run under cold water.
  2. Heat oven to 350.
  3. Heat the olive oil over medium heat and saute the shallots for about 5 minutes.
  4. Add the mushrooms and saute another 5 minutes.
  5. Stir in the chard, cover, and cook for about 3 more minutes.  Turn off the heat.
  6. In a large bowl crumble the tofu in your hands until it resembles ricotta cheese.
  7. Stir in the parmesan (if using), lemon zest, lemon juice, and salt and pepper.
  8. Add the chard mixture and mix well.
  9. Using a teaspoon fill each shell and place it in a 9×13 baking dish.  continue until you’re out of shells or the pan is full, and sprinkle any leftover chard mixture over the shells.
  10. Pour sauce over the shells and bake for 30 minutes.

Adapted From One Dish Vegetarian Meals by Robin Robertson

Zucchini Enchiladas


These enchiladas are yet another way to get the veggie-hater in your life to love veggies without even realizing it.  Shredding the zucchini and mixing it in with the shredded cheese makes for a creamy, delicious, and folate/manganese/potassium-filled meal.
 
These bad boys can be made gluten-free if you choose the right tortilla- AND did you know that the oil in zuchinni seeds is a good source of Omega-3s?  Seriously- what’s not to like about them!?


ZUCCHINI ENCHILADAS- serves 4


Make Ahead and Make it Easy

You can make the whole dish and stick it in the fridge or the freezer (if frozen you’ll want to double the cooking time).  If you are freezing or refrigerating don’t put the salsa on until you are ready to bake- lest the tortillas get soggy.
 
Another way to make this easier is to buy garlic flavored cream cheese instead of making your own.
 
Ingredients
  • 3 cups zucchini, grated with a cheese grater (3 small or 2 medium)
  • 2 cups Mexican Cheese Blend shredded cheese
  • 1/4 cup cilantro, chopped
  • 1 package 8″ tortillas (“fajita size”)- I like whole wheat flour but white flour or corn (gluten-free) are fine too!
  • 6 oz cream cheese mixed with 2 cloves chopped garlic, OR 6 oz. garlic cream cheese
  • 16 oz your favorite salsa
  • avocado, lime wedges, sour cream for garnish

How to make it

  1. Heat oven to 350.
  2. In a medium bowl mix together grated zucchini, cheese, and chopped cilantro.
  3. Spray a 9×13 inch baking dish with cooking spray
  4. Heat each tortilla one at a time on a dry skillet until it gets soft.  When it comes off the skillet spread 1 Tbs cream cheese on it and put 1/3 cup of the zucchini mixture on it.  Roll it up and put it in the pan.
  5. Repeat Step 4 until the pan is full.
  6. Pour the salsa over the top and cover with foil.
  7. Bake 25 minutes, uncover and bake 5 minutes more.
  8. Serve with avocado, lime wedges, and sour cream for garnish.

Poblano and White Bean Chili

Back in October 2010, Vegetarian Times ran a feature on the Poblano pepper.  I swear, every recipe in that aricle was to die for.  This was one of my favorites.  I’m not gonna lie- it is not a quick fix.  But it is a great candidate for prepping on a lazy weekend afternoon and throwing together after work, so check out the “Make Ahead and Make It Easy” tips!

Poblanos are high in vitamin C and low in calories and their flavor is perfect- a bit of kick but never too much spice.  White beans add fiber and protein.  Serve this over rice or with some tasty cornbread to sop it all up! 

To make it vegan simply omit the goat cheese.

 
POBLANO AND WHITE BEAN CHILI – serves 6
 
 Make Ahead and Make it Easy
 
 Though this recipe has a lot of steps there are a lot of them that can be done a few days early.  You can roast the peppers in advace and get them ready.  You can do everything through step 6 early and keep the chili in a container in the fridge for reheating.  I think this tastes even better after a day or two!
 
Ingredients
  • 6 poblano peppers
  • 2 tsp vegetable oil
  • 1 onion, cut in half and sliced thin
  • 2 cloves garlic, chopped
  • 1.5 tsp dried oregano
  •  2 15.5-oz. cans white beans, rinsed and drained
  • 2 cups veggie broth
  • 2 tsp dried oregano
  • 1 tsp ground cumin
  • 1 cup frozen corn kernels
  • 1/2 cup cilantro, chopped
  • 1 Tbs lime juice
  • 1/4 cup milk
  • 3 oz goat cheese
  • 1/4 cup pumpkin seeds

How to make it

  1. Turn on your broiler and place the poblanos within a few inches of the heat.  Rotate them every 5 minutes or so until they are nicely charred.
  2. Take them out and place them in a plastic bag tied shut.  This will allow them to steam and the skin will come off easier.
  3. Once the poblanos are cool, peel off the skin, remove the seeds and stems, and cut them into strips.
  4. Heat 2 tsp oil in a large skillet over medium heat. Add onion and cook until onion is soft. Add garlic, oregano and poblano strips, and cook 3 to 4 minutes more. Season with salt and pepper, if desired.
  5. Add beans, broth, remaining oregano and cumin to skillet and simmer over medium heat. Cook 15 minutes, stirring occasionally.
  6. Stir in corn, cilantro, and lime juice. Season with salt and pepper, if desired. Cook 2 minutes more.
  7. Warm milk in separate saucepan. Add goat cheese, and stir until smooth. Serve chili garnished with goat cheese sauce, pumpkin seeds, and cilantro.

Products We Love: Pre-Chopped Ginger

Yes, this Product We Love costs money (about $3.00 a jar).  But every time I bust it out for a recipe I think to myself “damn I am one savvy chef, I am saving so much time right now.”  Not to mention saving my fingertips and knuckles.  Cause whether the recipe calls for chopped or grated, dealing with fresh ginger is hazardous to my hands.  I’ve just never had good knife skills- what can I say.

In addition to whipping up stir fries and curries in no time, keeping chopped ginger on hand is great for bellyaches or a sore throat.  Just simmer in water for a while til it smells great, and strain it into a mug with some honey and lemon.  Aren’t you smart?

Flipper Approved Chickpea “Tuna” Salad

This is a great one for when you are super unmotivated but find yourself with a family to feed.   Or superunmotivated with just yourself to feed.  Either way, it will take you about 10 minutes to throw together and my unscientific uncontrolled studies have shown than 100% of tuna-eaters find this to be a great substitution (without Flipper’s friends on your conscience).  I invented it while on a 3 week vegan, gluten-free, animal-free, sugar-free, caffeine-free cleanse (don’t ask).
My kid likes this, my omnivorous huband likes this, even my dog likes this.  Mash it together, throw it on some bread on in a bowl of lettuce and you’ve got yourself a nutritious meal packed with calcium, iron, fiber, B vitamins, and protein.
FLIPPER APPROVED CHICKPEA “TUNA” SALAD – serves 4

 Make Ahead and Make it Easy

 There isn’t much you can do to make this recipe easier.  Whip up a batch and use it in sandwiches for work and school.  r, make a tuna melt and enjoy with a bowl of soup.
Ingredients
  • 2 14 oz cans chickpeas, drained
  • 1/2 cup vegan or regular mayonaise
  • 1 stalk celery, chopped
  • 1.5 Tbs lemon juice
  • 2 Tbs red onion, chopped
  • 1 tsp dried dill
  • 1 tsp salt
  • pepper to taste

How to make it

  1. Place the chickpeas in a bowl with the mayo and smash with a potato masher or a fork.  You will be very effective at this if you’ve had a long day at work or your kid is screaming in the background.
  2. Once the texture is to your liking, add in all the other ingredients, adjust the flavor as  needed, and you’re done.  See?  I told you it was easy.

Secret Mission Cauliflower Soup

 
The thing about veggies is that veggie haters assume they are all green, and therefore easily identifiable.  The thing about cheese is, it makes everything awesome.  So there you have it.  The Secret Mission that this soup is named after is “Mission: Get-Vegetable-Hater-to-Consume-a-Full-Day’s-Worth-of-Vitamin-C-Plus-Lots-of-Fiber-Folate-Calcium-and-Phytonutrients.”  Now that mission is important, as evidenced by the sheer number of syllables in its name.
 
If the blue cheese varieties are too strong, I think this would work quite well with just about any type of cheese.  I also think you could mix n’ match veggies (broccoli and carrots come to mind).  Be sure to let us know what you try!  Serve it up with some braised greens and bread (shown- and don’t bother making the veggie hater eat the greens.  You’ve got to pick your battles) for a well-rounded and fast dinner.
 
SECRET MISSION CAULIFLOWER SOUP – serves 8
 

Make Ahead and Make it Easy

 Make this soup a few days in advance and slowly heat it back up when you are ready to eat it.  Some folks don’t like freezing dairy based soups but I find they freeze just fine.  Be sure to freeze it from room temperature and re-heat slowly, stirring often.
 
Ingredients
    • 3 Tbs butter or olive oil
    • 2 onions, chopped
    •  4 celery stalks, chopped
    • 4 cups cauliflower, roughly chopped
    • 4 cups veggie broth
    • 2 cups milk
    • 4 oz (2/3 cup) cheese from the blue family (Stilton, Gorgonzola, etc.)
    • 1 cup cream
    • salt and pepper to taste

How to make it

    1. Melt butter in a large soup pot or dutch oven over medium heat.
    2. Add onion, celery and cauliflower and cook about 10 minutes
    3. Add broth, reduce heat  and simmer until cauliflower is very soft- about half an hour
    4. Stir in 2 cups of the milk and use a blender, food processor, or immersion blender to puree the soup (be very careful as hot liquids can explode in the blender!).
    5. Return to pot, add cheese, cream, salt, and pepper.